Difference between revisions of "Composting toilet"
m (Notation,) |
(→Construction) |
||
| (123 intermediate revisions by the same user not shown) | |||
| Line 1: | Line 1: | ||
| + | [[Image:Urine_diversion_1.jpg|thumb|left| urine diversion - pedestal [http://www.susana.org/_resources/documents/default/2-1148-giz2011-en-appendix-3-ud-pedestals-suppliers-list.pdf suppliers] [https://commons.wikimedia.org/wiki/File:Cleaning_a_urine-diverting_dry_toilet_(UDDT)_in_Johannesburg_(2947142348).jpg#/media/File:Cleaning_a_urine-diverting_dry_toilet_(UDDT)_in_Johannesburg_(2947142348).jpg]]] | ||
[[Image:Urine_diversion.jpg|thumb|left| urine diversion ]] | [[Image:Urine_diversion.jpg|thumb|left| urine diversion ]] | ||
| − | [[Image:Composting_toilet.jpg|thumb|right| [http://en.wikipedia.org/wiki/Composting_toilet#mediaviewer/File:Clivus_Multrum_Composting_toilet_with_urine_diversion-dehydration.svg Clivus Multrum] adapted for solar | + | [[Image:Composting_toilet.jpg|thumb|right| [http://en.wikipedia.org/wiki/Composting_toilet#mediaviewer/File:Clivus_Multrum_Composting_toilet_with_urine_diversion-dehydration.svg Clivus Multrum] adapted for solar chimney and urine re-use |
- 1. Humus compartment 2. Ventilation inflow 3. WC 4. Urinal 5. Urine collection 6. Manual paddles 7. Solar heating of ventilation outflow ]] | - 1. Humus compartment 2. Ventilation inflow 3. WC 4. Urinal 5. Urine collection 6. Manual paddles 7. Solar heating of ventilation outflow ]] | ||
[[Image:Urine_diversion_2.jpg|thumb|left| urine diversion - squatting [http://en.wikipedia.org/wiki/Urine-diverting_dry_toilet#mediaviewer/File:Inside_of_the_UDDT_(5332645379).jpg]]] | [[Image:Urine_diversion_2.jpg|thumb|left| urine diversion - squatting [http://en.wikipedia.org/wiki/Urine-diverting_dry_toilet#mediaviewer/File:Inside_of_the_UDDT_(5332645379).jpg]]] | ||
| + | [[Image:012.jpg|thumb|right| [http://www.waiwiki.org/index.php?title=Composting_toilet_scale_model scale model ]]] | ||
| + | [[Image:Urine_diversion_3.jpg|thumb|left| urine diversion - squatting [https://commons.wikimedia.org/wiki/File:Squatting_pan_of_urine_diversion_dehydration_toilet_(UDDT)_(2957045329).jpg#/media/File:Squatting_pan_of_urine_diversion_dehydration_toilet_(UDDT)_(2957045329).jpg]]] | ||
It is estimated that the excreta from 80 persons could fertilize a hectare. A single adult eats 250 kg of cereals per year, which may be grown on less than 250 m<sup>2</sup>, fertilised by ~50% of the urine of that person, mixed with the waste water used by that person.[http://www2.gtz.de/Dokumente/oe44/ecosan/en-fighting-urine-blindness-1998.pdf] | It is estimated that the excreta from 80 persons could fertilize a hectare. A single adult eats 250 kg of cereals per year, which may be grown on less than 250 m<sup>2</sup>, fertilised by ~50% of the urine of that person, mixed with the waste water used by that person.[http://www2.gtz.de/Dokumente/oe44/ecosan/en-fighting-urine-blindness-1998.pdf] | ||
| Line 18: | Line 21: | ||
==Carbon / Nitrogen ratio== | ==Carbon / Nitrogen ratio== | ||
| + | [[Image:Panicum_texanum.jpg|thumb|left| Panicum texanum [http://twig.tamu.edu/keyindex.htm]]] | ||
| + | [[Image:Arundinaria_gigantea_2.jpg|thumb|right| Arundinaria gigantea [http://galleryhip.com/arundinaria-gigantea.html]]] | ||
Dry material, which contains carbon (such as dry leaves or grasses) increases composting properties. It regulates moisture and the carbon to nitrogen ratio (C/N) and enhances the composting process. The optimal carbon to nitrogen ratio for thermophilic composting is 20 to 35 (WHO 2006). The C/N ratio of humanure (135 to 270 g / person / day) is about 5 to 10 (5%-7% nitrogen) The C/N ratio of grass clippings may be 12-19 and they may contain 2.4% nitrogen. The C/N ratio of leaves may be 48 and they may contain 0.9% nitrogen.[http://www.weblife.org/humanure/chapter3_7.html] Thus 200 g humanure plus 225 g leaves may render a combined C/N ratio of 30. | Dry material, which contains carbon (such as dry leaves or grasses) increases composting properties. It regulates moisture and the carbon to nitrogen ratio (C/N) and enhances the composting process. The optimal carbon to nitrogen ratio for thermophilic composting is 20 to 35 (WHO 2006). The C/N ratio of humanure (135 to 270 g / person / day) is about 5 to 10 (5%-7% nitrogen) The C/N ratio of grass clippings may be 12-19 and they may contain 2.4% nitrogen. The C/N ratio of leaves may be 48 and they may contain 0.9% nitrogen.[http://www.weblife.org/humanure/chapter3_7.html] Thus 200 g humanure plus 225 g leaves may render a combined C/N ratio of 30. | ||
The C/N ratio of Panicum texanum is 32.9:1.[http://www.researchgate.net/publication/24186263_Nematode_Population_Fluctuations_during_Decomposition_of_Specific_Organic_Amendments] Thus 200 g humanure plus 1379 to 1724 g. [http://www.waiwiki.org/index.php?title=Silica_in_Poaceae#Panicum Panicum texanum] may render a combined C/N ratio of 30. | The C/N ratio of Panicum texanum is 32.9:1.[http://www.researchgate.net/publication/24186263_Nematode_Population_Fluctuations_during_Decomposition_of_Specific_Organic_Amendments] Thus 200 g humanure plus 1379 to 1724 g. [http://www.waiwiki.org/index.php?title=Silica_in_Poaceae#Panicum Panicum texanum] may render a combined C/N ratio of 30. | ||
| Line 37: | Line 42: | ||
[[Image:Urine-nutrients_3.jpg|thumb|right| Urine composition - c [http://ntrs.nasa.gov/archive/nasa/casi.ntrs.nasa.gov/19710023044.pdf © NASA]]] | [[Image:Urine-nutrients_3.jpg|thumb|right| Urine composition - c [http://ntrs.nasa.gov/archive/nasa/casi.ntrs.nasa.gov/19710023044.pdf © NASA]]] | ||
[[Image:Urine-nutrients_2.jpg|thumb|left| Urine composition - b [http://ntrs.nasa.gov/archive/nasa/casi.ntrs.nasa.gov/19710023044.pdf © NASA]]] | [[Image:Urine-nutrients_2.jpg|thumb|left| Urine composition - b [http://ntrs.nasa.gov/archive/nasa/casi.ntrs.nasa.gov/19710023044.pdf © NASA]]] | ||
| + | [[Image:measurements.jpg|thumb|right| plan measurements ]] | ||
Excessive ammonia from urine inhibits the microbial processes in the chamber. With urine diversion, less bulking agent is needed and the C/N ratio is naturally enhanced. | Excessive ammonia from urine inhibits the microbial processes in the chamber. With urine diversion, less bulking agent is needed and the C/N ratio is naturally enhanced. | ||
| − | The C/N ratio of urine (1-2 L / person / day) is about 0.8 and its nitrogen content is ~15-18%.[http://www.weblife.org/humanure/chapter3_7.html] | + | The C/N ratio of urine (1-2 L / person / day) is about 0.8, pH is 5 to 8, and its nitrogen content is ~15-18%.[http://www.weblife.org/humanure/chapter3_7.html] |
Urine can contain up to 90 percent of the nitrogen, up to 50 percent of the phosphorus, and up to 70 percent of the potassium present in human excreta.[http://www2.gtz.de/Dokumente/oe44/ecosan/en-fighting-urine-blindness-1998.pdf] It may contain 9.3 g/L urea, 1.9 g/L chloride, 1.2 g/L sodium, 0.8 g/L potassium, 0.5 g/L phosphorus and 0.2 g/L ammonia.[http://ntrs.nasa.gov/archive/nasa/casi.ntrs.nasa.gov/19710023044.pdf] | Urine can contain up to 90 percent of the nitrogen, up to 50 percent of the phosphorus, and up to 70 percent of the potassium present in human excreta.[http://www2.gtz.de/Dokumente/oe44/ecosan/en-fighting-urine-blindness-1998.pdf] It may contain 9.3 g/L urea, 1.9 g/L chloride, 1.2 g/L sodium, 0.8 g/L potassium, 0.5 g/L phosphorus and 0.2 g/L ammonia.[http://ntrs.nasa.gov/archive/nasa/casi.ntrs.nasa.gov/19710023044.pdf] | ||
In healthy individuals it is usually pathogen free, although undiluted it may contain inorganic salts and organic compounds at levels toxic to plants. Ureum decomposes into ammonia, which smells. | In healthy individuals it is usually pathogen free, although undiluted it may contain inorganic salts and organic compounds at levels toxic to plants. Ureum decomposes into ammonia, which smells. | ||
| Line 46: | Line 52: | ||
Though carbon is its principal required nutrient, [http://www.waiwiki.org/index.php?title=Algae_for_Tilapia#Spirulina Spirulina platensis] may be grown on human urine [http://link.springer.com/article/10.1631/jzus.2007.A1846#page-1] | Though carbon is its principal required nutrient, [http://www.waiwiki.org/index.php?title=Algae_for_Tilapia#Spirulina Spirulina platensis] may be grown on human urine [http://link.springer.com/article/10.1631/jzus.2007.A1846#page-1] | ||
At pH 8.4, urea may be used as a source of nitrogen up to 1.5 g/L.[http://link.springer.com/article/10.1007%2FBF02179776#page-1] Since human urine typically contains about 9.3 gram urea per L [http://ntrs.nasa.gov/archive/nasa/casi.ntrs.nasa.gov/19710023044.pdf], 1 L of urine may be added to 5.2 L of clean water (or 161 ml of urine per L clean water). | At pH 8.4, urea may be used as a source of nitrogen up to 1.5 g/L.[http://link.springer.com/article/10.1007%2FBF02179776#page-1] Since human urine typically contains about 9.3 gram urea per L [http://ntrs.nasa.gov/archive/nasa/casi.ntrs.nasa.gov/19710023044.pdf], 1 L of urine may be added to 5.2 L of clean water (or 161 ml of urine per L clean water). | ||
| − | Best cellular growth may occur at 500 mg/L of urea.[http://www. | + | Best cellular growth may occur at 500 mg/L of urea (53 ml urine per L clean water), as excess of urea decreases the efficiency of utilization of this nutrient.[http://www.researchgate.net/publication/8944858_Chlorophyll_production_from_Spirulina_platensis_cultivation_with_urea_addition_by_fed-batch_process/links/00b49520b6bee1f1be000000.pdf] Growth may be optimal when the urea feeding rate is slowly increased [http://www.sciencedirect.com/science/article/pii/S0044848604005952] and at 29°C. [http://onlinelibrary.wiley.com/doi/10.1002/bit.21097/abstract] Best results are obtained by continuous urea addition in exponentially increasing amounts, at 30°C.[http://www.sciencedirect.com/science/article/pii/S0961953402000545] Intermittent addition of urea yields results similar to those obtained by the continuous feeding.[http://www.sciencedirect.com/science/article/pii/S0144860904000263] Spirulina platensis may use several nitrogen sources; most effectively sodium nitrate, ammonium nitrate and urea.[http://link.springer.com/article/10.1023/A:1011925022941#page-1] Spirulina platensis grows better on urea than on potassium nitrate.[http://link.springer.com/article/10.1385/ABAB:112:3:143#page-1] Nitrate may yield a higher dry weight.[http://www.sciencedirect.com/science/article/pii/S0167299104803203] Better biomass productivity values are observed with the use of urea as the nitrogen source, when compared to potassium nitrate, the traditional nitrogen source for Spirulina platensis cultivation.[http://www.researchgate.net/publication/8944858_Chlorophyll_production_from_Spirulina_platensis_cultivation_with_urea_addition_by_fed-batch_process/links/00b49520b6bee1f1be000000.pdf] |
| − | by a higher methionine and arginine content.[http://link.springer.com/article/10.1007/BF00444067#page-1] Urea is the best source for increasing γ-linolenic acid contents in Spirulina [http://link.springer.com/article/10.1007/BF00218450#page-1] and production is elevated in the dark.[http://link.springer.com/article/10.1007/BF02920244#page-1] Though Spirulina platensis may tolerate high levels of urea better [http://link.springer.com/article/10.1007/s10295-005-0025-8#page-1], it is ammonium resistant at high pH.[http://pcp.oxfordjournals.org/content/32/7/953.short] The uptake of ammonia in Spirulina platensis (supporting optimal growth) is pH dependent with an optimum at pH 9.3, proceeding at the same rates in the light and in the dark.[http://pcp.oxfordjournals.org/content/30/2/303.short] High productivity is achieved when ammonia is maintained at up to 50% of the total nitrogen.[http://www.sciencedirect.com/science/article/pii/S0960852410018213] The uptake of nitrate is light energy dependent, and the reduction of nitrite consumes energy.[http://www.sciencedirect.com/science/article/pii/S0306261910005623] | + | In combination with bicarbonates, urea may be more effective than ammonium and nitrate.[http://docsdrive.com/pdfs/academicjournals/ajpp/0000/47496-47496.pdf] |
| + | Spirulina, when grown with urea as the nitrogen source, is characterized by a higher methionine and arginine content.[http://link.springer.com/article/10.1007/BF00444067#page-1] | ||
| + | Urea is the best source for increasing γ-linolenic acid contents in Spirulina [http://link.springer.com/article/10.1007/BF00218450#page-1] and production is elevated in the dark.[http://link.springer.com/article/10.1007/BF02920244#page-1] Though Spirulina platensis may tolerate high levels of urea better [http://link.springer.com/article/10.1007/s10295-005-0025-8#page-1], it is ammonium resistant at high pH.[http://pcp.oxfordjournals.org/content/32/7/953.short] Under alkaline conditions urea is spontaneously hydrolysed to ammonia.[http://www.sciencedirect.com/science/article/pii/S0961953402000545] The uptake of ammonia in Spirulina platensis (supporting optimal growth) is pH dependent with an optimum at pH 9.3, proceeding at the same rates in the light and in the dark.[http://pcp.oxfordjournals.org/content/30/2/303.short] High productivity is achieved when ammonia is maintained at up to 50% of the total nitrogen.[http://www.sciencedirect.com/science/article/pii/S0960852410018213] The uptake of nitrate is light energy dependent, and the reduction of nitrite consumes energy.[http://www.sciencedirect.com/science/article/pii/S0306261910005623] The mean lethal concentrations of unionised ammonia for Oreochromis niloticus larvae is 1 mg/L and 7.4 mg/L for fingerlings.[http://mistug.tubitak.gov.tr/bdyim/abs.php?dergi=vet&rak=0306-44] | ||
| + | |||
| + | ==Construction== | ||
| + | [[Image:Foundation-1.jpg|thumb|left| foundation ]] | ||
| + | [[Image:Foundation-2.jpg|thumb|right| foundation measurements ]] | ||
| + | [[Image:Foundation-3.jpg|thumb|left| foundation ]] | ||
| + | [[Image:Base.jpg|thumb|right| The base ]] | ||
| + | [[Image:Measuring-1.jpg|thumb|left| Measuring the foundation locations]] | ||
| + | [[Image:Masonry-1.jpg|thumb|right| Masonry ]] | ||
| + | [[Image:Measuring-2.jpg|thumb|left| Measuring the foundation locations]] | ||
| + | [[Image:Masonry-1a.jpg|thumb|right| Masonry - helicopter overview]] | ||
| + | [[Image:Top-of-pyramid.jpg|thumb|left| At the top of the pyramid ]] | ||
| + | [[Image:Masonry-1d.jpg|thumb|right| Masonry - view from the south]] | ||
| + | [[Image:Top-of-pyramid-2.jpg|thumb|left| Supporting columns ]] | ||
| + | [[Image:Masonry-1b.jpg|thumb|right| Masonry ]] | ||
| + | [[Image:Top-of-pyramid-3.jpg|thumb|left| Supporting column - helicopter overview]] | ||
| + | [[Image:Masonry-2.jpg|thumb|right| Masonry ]] | ||
| + | [[Image:Steps-1.jpg|thumb|left| Steps ]] | ||
| + | [[Image:Masonry-1c.jpg|thumb|right| Masonry - helicopter overview]] | ||
| + | [[Image:Steps-2.jpg|thumb|left| Steps ]] | ||
| + | [[Image:Masonry-3.jpg|thumb|right| Masonry ]] | ||
| + | [[Image:Steps-3.jpg|thumb|left| Steps ]] | ||
| + | [[Image:Masonry-4.jpg|thumb|right| Masonry ]] | ||
| + | [[Image:Cabin-floor-1b.jpg|thumb|left| North side view]] | ||
| + | [[Image:Masonry-5.jpg|thumb|right| Masonry ]] | ||
| + | [[Image:Cabin-floor-1c.jpg|thumb|left| South side view ]] | ||
| + | [[Image:Cabin-floor.jpg|thumb|right| Top of the slide ]] | ||
| + | [[Image:Cabin-floor-2.jpg|thumb|left| Top of the slide ]] | ||
| + | [[Image:Cabin-floor-3.jpg|thumb|left| Top of the slide ]] | ||
| + | |||
| + | |||
| + | For a continuous composting toilet, you need a 'slide'; a concrete chamber constructed on a slope. A small hill is of course ideal for building a continuous composting toilet on. You may also create a big pile of sand to build such a toilet on. | ||
| + | The top of the hill initially needs to be about 3 meters high. The slope on which the slide of the composting toilet will be build needs to be set at 30 degrees (both sides of the pile). | ||
| + | Both at the base of the steps and at the base of the slide, foundations need to be build. In this report, concrete blocks used for constructing the slide, the steps and the cabin are standard size concrete blocks as used in Ghana: 46 cm * 22 cm * 13 cm. Reinforced concrete used for the sides and the supporting columns is 10 cm thick, including the reinforcing steel bars. | ||
| + | |||
| + | * 1) If no natural hill can be used, one needs to create one. But before doing so, it is most easy to construct the foundations first. That is because measuring the distance between the 2 foundations is more difficult when there is a pile of sand in between them. The space in between those 2 foundations needs to be 676 cm. The holes for the foundations need to be 120 cm deep and 200 cm wide, and 130 cm (the smallest one) and 160 cm long (the biggest one). to maximize sun exposure to the ventilation pipes, in countries in the Northern hemisphere (such as Ghana, The USA and Europe), the biggest foundation needs to be on the south side, and the smalles one on the north side. For countries in the southern hemisphere (such as Australia, South Africa, Argentina), this needs to be the other way around. See illustration A. The concrete in the foundations may contain medium sized rocks (up to 25 cm diameter). You need a framework of steel rods to reinforce the foundations and connect them to the reinforcing bars in the reinforced concrete on the sides of the pyramid. All around the steel framwork, you may fill up the foundation holes with concrete blocks for filling and support. In the largest foundation, you need to connect 2 steel rods extending 104 cm vertically into the air to the steel framework, both at 111 cm from where the foundation begins (from the perspective of sitting on the hill). Spacing (in width) between those 2 steel rods needs to be 112 cm. In width, they are both 56 cm away from the center of that 200 cm wide foundation. See illustration A. Spacing for the (at 30 degrees) steel rods (2x8) that will be connected to the steel rods framework in the sides (at 30 degrees also), needs to be 27 cm. Thus, they need to be placed at 5 cm, 32 cm, 59 cm, 86 cm, 113 cm, 140 cm, 168 cm and 195 cm, all 5 cm inside the foundation. See illustration A. Also, these 30 degrees steelrods in the foundation need to be extended above ground, maybe as much as 50 cm. That way you may connect (weld) them to the steel rods reinforcing the sides of the pyramid. See illustration B. | ||
| + | |||
| + | * 2) After constructing the foundations, one should dump a big truckload of sand in between the newly created foundations, and let it sit for as long as possible (preferrably months, or even years), so that the rains may let the sand pile become more compact. Once sufficiently compact, the top of the pile should be at least 300 cm. Eventually, the more compact pile of sand needs to be shaped into a pyramid that is 225 cm high at its peak. Then level the top at 213 cm high. This leveled top needs to be 200 cm long and 40 cm wide. See illustration E. The 40 cm sides should face east and west. | ||
| + | Before the pile is levelled at 213 cm high, the bottom of the sand pile should be 676 cm wide for a breadth of at least 2 meters (the width of the base). A that width (676 cm), the sides of the pyramid should be 455 cm each, which constitues an angle of 30 degrees. (each 30 cm of going wide comes with going up or down 20 cm) See Illustration E. | ||
| + | |||
| + | * 3) Alternatively, you can also dump the sand first, and then build the foundations. Or maybe there is a natural hill already, or a big rock or similar. In that case, you need to work around the hill/rock to measure the distance between the 2 foundations. See illustration D. Create a large C-shaped framework of planks. Then place it around the hill to determine where the foundations should be. This framework can only give you the correct locations for the foundations if it is perfectly right-angled. To construct a perfectly righ-angled frame, you just need to follow the instruction in illustration C; First you need a plank (or several planks connected) that is 676 cm plus 2 times its width (say 2 * 20 cm = 40 cm) long; in this case 716 cm in total. Then you need to attach 2 more planks (each at least 338 cm long), both in a right angle. To make these perfectly right-angled, you need to attach 2 additional planks (each at least 240 cm long), at an angle of exactly 45 degrees. To do so, the measurements and attachment points need to be exact, as illustrated. This will create 2 right-angled triangles measuring 150 * 150 * 212 cm; coloured purple in illustration C. | ||
| + | |||
| + | * 4) One month after constructing the foundations, you may continue with the next step. One month of waiting allows for an increase in strength of up to about 60% of ultimate strength of the foundation. As shown in illustration E and F, use 2 concrete blocks; face down. (13 cm height, 46 cm width, 22 cm breadth, on top of 1 cm mortar) Then work your way up from the foundations to the top of the pile, covering the sides with reinforced concrete; 200 centimeters wide. The reinforced concrete on both sides needs to be made 10 cm thick, totally suspending the steel rods midways. For this you first need to cover the sand with wooden casts (with approximately 0.5 cm thick plates on both sides and on top; eg triplex / duplex plates) Put 3 cm rocks underneath the rods, so the rods will be suspended in the concrete. Connect steel rods to all the (2x8) rods extending at 30 degrees from the foundations. Again use about 27 cm spacing for the steel rods, with #1 and #8 placed only 5 cm from the side. Thus, again, they need to be placed at 5 cm, 32 cm, 59 cm, 86 cm, 113 cm, 140 cm, 168 cm and 195 cm width. So, for the 200 cm width you will need 8 parrallel running steel rods. Connect the reinforcing steel rods on the sides (2x8) with the (8) ones on top. The steel rods on top of the base need to be 154 to 158 cm long. Spacing should be similar, at 5 cm, 32 cm, 59 cm, 86 cm, 113 cm, 140 cm, 168 cm and 195 cm width. | ||
| + | |||
| + | Of course you may also use prefabricated 200 cm wide steel bar welded mesh sheets. And if only 240 cm wide steel bar mesh sheets are available, of course you should make the base 240 cm wide (including the foundations). Of course, thicker steel rods will give greater span strength, due to their greater thickness. Usually, the sheets and rods are 600 cm long. That is exactly what you may squeeze into the total of foundation plus sides. If you want to use the entire 6 meter long rods or sheets, create 2 big foundations of 120 cm deep and 190 cm long (plus 200 or 240 wide, of course). Then they may fit perfectly. Instead of using full length rods, you may also connect (weld) several shorter rods to get to that total length. | ||
| + | |||
| + | When constructing the steel framework for the sides, you also need to insert steel rods for constructing the back wall of the slide (side 4 of the [http://www.waiwiki.org/index.php?title=Composting_toilet_scale_model scale model]). They should be 115 cm long, measured from where connected to the steel rods on the side of the pyramid. Naturally, these rods may be much longer (eg 200 cm), because when they extensively penetrate the sand on the bottom side, this may enable easy welding when connecting them to the rods on the slide side of the pyramid. Spacing should be done very accurately, as they will support both the cabin floor and the top of the slide, with the latter having specific requirements. See illustration F3. Place the rods at 5 cm, 24 cm, 42 cm, 62 cm, 82 cm, 100 cm, 118 cm, 138 cm, 158 cm, 176 cm and 195 cm. | ||
| + | |||
| + | When pouring the concrete slab, only do the sides of the pyramid. That is because you need to let the concrete rest for another month to let it gain strength. | ||
| + | |||
| + | * 5) Then create the casts for the back wall of the slide and for the cabin floor, and fill them with concrete. See illustration F2. This time you do not need to wait any time before going on to perform step #6. | ||
| + | |||
| + | * 6) Next you need to construct the steps. Start with placing one concrete block at the bottom of the pyramid, In the center of its 200 (or 240 cm) width. The full 46 cm long side of the block should align with the side of the pyramid, 13 cm high and 22 cm wide. See illustration G. Fill up the triangle-shaped space between the block and the pyramid using stones and concrete. Add just 0.5 cm of mortar on top of the tip of the concrete block. The second block should be placed on top of that, aligning with the pyramid. That way, the 2nd block will overlap about just 1 or 2 cm of the 1st block, and lean on the pyramid on the other side. See illustration H. Again, fill up the triangle-shaped space between the block and the pyramid using stones and concrete. Repeat this 13 more times, until you have used 15 blocks (steps) in total. See illustration i. The last one needs to be cut and placed just behind block #15 , level with the cabin floor. | ||
| + | |||
| + | * 7) Then place 2 concrete blocks on the cabin floor, on their sides (22 cm high). Place a 250 cm long plank on top of them, such that the free end of the plank extends 95 cm beyond the back wall of the slide. Place another concrete block on top of the plank, to keep it level. See illustration J. Then hammer a nail in at the outer end of the free end of the plank. Then tie a thread around the nail and tightly connect the other end of the thread to the bare piece of steel bar sticking out from the frontside column. This will function as the upper limit for the masonry work; for cementing the concrete blocks. | ||
| + | |||
| + | * 8) The concrete blocks will form side 2 and 3 of the [http://www.waiwiki.org/index.php?title=Composting_toilet_scale_model scale model], supporting the top of the slide. We will use the standard size concrete blocks in Ghana: 46 cm * 22 cm * 13 cm. You should start working your way up aligning the blocks to the left side (to the bottom of the slide; side 1 in the [http://www.waiwiki.org/index.php?title=Composting_toilet_scale_model scale model]). Place each whole new block as far to the left as possible. This way you need to work your way 7 blocks up. See illustration k. | ||
| + | |||
| + | * 9) Then fill up all the spaces on the right side of the composed concrete blocks with broken blocks, stones and mortar. See illustration L. | ||
| + | |||
| + | * 10) Then continue with whole (intact) blocks. Align these blocks to the right, in such a way that the tops of block number 8, 9 and 10 all just touch rope Y. See illustration M. This way, block number 10 will align with the covering plank X. | ||
| + | |||
| + | * 11) Then again use whole and broken blocks, stones and mortar to fill up the remaining spaces. See illustration N. | ||
| + | |||
| + | * 12) After another month, the top of the slide may be constructed, again using a wooden cast and reinforced concrete. See illustration O. For the measurements, see illustration P for a view from above ("helicopter view"). In illustration Q, the locations of the steel rods from the supporting columns penetrating into the cabin floor are shown by red squares. | ||
| + | |||
| + | * 13) Lastly (after another month), the cabin is constructed, using wood or concrete blocks. | ||
| + | |||
| + | ==Concrete== | ||
| + | The foundation and the base of the construction (collectively named "the base" here), need to be constructed using reinforced concrete. All the reinforced concrete used for covering the sides of the pyramid, for erecting the back and the front wall of the slide, and for the floor of the toilet cabin and extending the top of the pyramid to the floor of the cabin, will be 10 cm thick. At the bottom of the pyramid, the reinforcing steel bars from both sides of the pyramid need to be attached (welded) to the steel framework in the foundations. On the top of the pyramid, the bars from both sides of the pyramid need to be welded together at their junction. From that concrete top, the bars need to extend a further 71 cm extra into the air, on both sides. For the base (the sides of the pyramid) you need long reinforcing steel bars, which may be several smaller ballers connected (welded) to each other. Total length of the longest one is 630 cm (at the side of the slide) and the other one is 599 cm. At each side you need 8 bars, to create a width of 200 cm. Again, you need to place 3 cm rocks underneath the reinforcing bars. If the reinforcing bars are not raised, they will not be suspened in the slab, weakening the structure. | ||
| + | |||
| + | For the foundations in the ground you need to construct a small framework (cage) of steel. The framework may be supported by concrete blocks. If not, use 3 cm diameter rocks on the bottom of the hole to place the cage on, so that the slab may creep under the lowest reinforcing bars of the cage. The largest foundation (on the slide side) needs to be 160 * 120 * 200 cm. The smaller foundation needs to be 130 * 120 * 200 cm. | ||
| + | |||
| + | Concrete blocks are best made on-site. That is because in developing countries commercially purchased blocks are often weak, due to the manufacturer using too little cement, or poor quality sand to save costs. The blocks may also have been allowed too little time to cure. Making blocks on-site, you need good quality sand (also needed for creating the hill) and a block-pressing machine. Good quality sand contains little organic material, clay, silt, salt or mica. When you buy cement, make sure the cement has not been exposed to water, and was preferrably stored in plastic (garbage) bags. | ||
| + | |||
| + | For good concrete, you need about twice as much rocks (in volume) as sand. The more cement is used, the stronger the concrete will be. A good ratio is 1:2:4 (one bucket cement, 2 buckets sand and 4 buckets filled with stones). The mortar for masonry work (for laying block and parging) should contain 3 to 4 buckets of sand for each bucket of cement used. The rocks should be maximally 3 cm in diamter. For the foundation (only) though, also bigger rocks may be used. | ||
| + | |||
| + | =='The Volcano', for mixing== | ||
| + | The universally applied method for mixing water into the dry aggregate is 'the volcano'. First you make a pile. Then you use a shovel to create a mound with a crater in the middle, where the water is added. Use the shovel to add some dry aggregate from the edges into the water, while moving around the pile in a circle. Slowly the mix will get thicker, and you may widen the crater. But never add too much water at once, as this will make the wall collapse, and cement to be spilled. Once all the aggregate has been mixed in and has absorbed some water, the mix is strong enough to hold itself up when placed on the floor in large clumps. Then you need to turn it all over several times, to create an overall uniform consistency. Extra water will decrease the strength. Within hours of adding water, the mix has finished setting, and can no longer be worked. The finished product should be covered with plastic, particularly in tropical conditions. If left uncovered, the end product will dry way too fast, which will cause cracking. After drying, the mortar and concrete need to time to develop strength. About 10 days later, the product will have gained 50% of its ultimate strength. This will have increased to 95% after 6 months, and 100% after one year. | ||
| + | |||
| + | ==Toilet Seat== | ||
| + | [[Image:Separett_Privy.jpg|thumb|right| Separett Privy [http://www.separett.com/Torrdass-500-eu]]] | ||
| + | [[Image:Separett_Privy_Installation.jpg|thumb|right| Installation [http://www.separett.com/Torrdass-500-eu]]] | ||
| + | For toilet seat you may buy a premanufactured urine diverting kit (eg Separett Privy; about 140 euro), or you may use a normal toilet seat with a funnel (for urine) installed on the front. Such a funnel can be ceramic, locally manufactured, or plastic. The funnel should have a 18 cm diameter, and should be connected to a hose that channels the urine to a urine deposit container. | ||
Latest revision as of 07:37, 23 March 2016
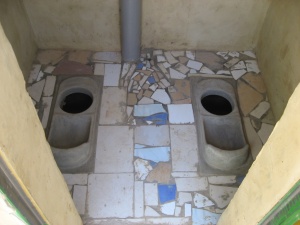
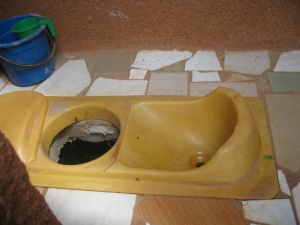
It is estimated that the excreta from 80 persons could fertilize a hectare. A single adult eats 250 kg of cereals per year, which may be grown on less than 250 m2, fertilised by ~50% of the urine of that person, mixed with the waste water used by that person.[8]
Composting toilets aerobically decompose waste material, by aerobic microorganisms in a highly aerated, warm (32°C - 49°C) and moist (humidity >80%) environment, with ample carbon (sawdust as the sole agent will lead to clogging[9]). During composting, mineralization, and humification occur simultaneously and are the main processes leading to degradation of the fresh organic matter. Organic matter humification in composting occurs when lignin and its degradation products are degraded by the microorganisms.[10] Optimally, the volume of the resulting compost may be about 10% of input.[11]
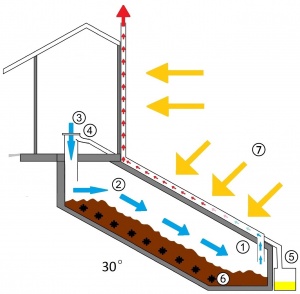
Continuous composting toilets are single container toilets that receive excrement which decomposes as it moves slowly through the container and is removed as compost from the end-product chamber. The container is permanently fitted under the toilet seat, and never has to be fully emptied as the compost can be gradually removed when it reaches the end-product chamber. [12] To make the fresh material move down the slope, the slope needs to be slippery, eg bathroom tiles. Natural zeolite may be used as medium for the sorption of ammonia from wastewater and subsequently as nitrogen releaser in cultures of Spirulina platensis.[13]
In a non-urine-diverting system, 90% of what goes into a composting toilet is water. Compost piles need to be damp to work well, but most composting toilets suffer from too much water. (ideally 45 to 70% moisture content [14]) Ammonia may evaporate as nitrogen in a gas form, which is vented out along with carbon dioxide and water vapor.[15] Evaporation is the primary way a composting toilet gets rid of excess water. Warmth and air flow through the unit assist the evaporation process. Every composting toilet has a vertical vent pipe to carry off moisture. Air flows across the drying trays, around and through the pile, then up the vent to the outside of the building. In a cold environment, the low-grade heat produced by composting is supposed to provide sufficient updraft to carry vapor up the vent.[16] In tropical conditions, passive solar heating may create an air draft.
If operation conditions for thermophilic composting are adequate (moisture content 50 to 60%, carbon to nitrogen ratio 30 to 35 and mixing with bulking material), the temperature will rise to between 50 and 65 °C (WHO 2006). Such temperatures will effectively inactivate pathogens (WHO 2006).[17] If moisture content is too high, anaerobic organisms will thrive, creating undesirable odors from anaerobic digestion.
Contents
Carbon / Nitrogen ratio
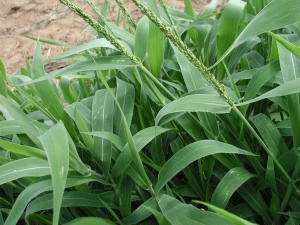

Dry material, which contains carbon (such as dry leaves or grasses) increases composting properties. It regulates moisture and the carbon to nitrogen ratio (C/N) and enhances the composting process. The optimal carbon to nitrogen ratio for thermophilic composting is 20 to 35 (WHO 2006). The C/N ratio of humanure (135 to 270 g / person / day) is about 5 to 10 (5%-7% nitrogen) The C/N ratio of grass clippings may be 12-19 and they may contain 2.4% nitrogen. The C/N ratio of leaves may be 48 and they may contain 0.9% nitrogen.[18] Thus 200 g humanure plus 225 g leaves may render a combined C/N ratio of 30. The C/N ratio of Panicum texanum is 32.9:1.[19] Thus 200 g humanure plus 1379 to 1724 g. Panicum texanum may render a combined C/N ratio of 30.
Crude protein in the leaves of Giant cane (Arundinaria gigantea) is relatively low in young leaves.[20] The C/N ratio in Giant cane leaves may be 19.4 (2.4% nitrogen and 45.8% carbon).[21] Bamboo shoots may contain 0.6% nitrogen. Overall bamboo litter (culm, branches, leaves) may contain 1.4% nitrogen.[22] The carbon concentration in decomposing bamboo culms may be 50%, irrespective of decomposition level. Mean nitrogen concentration may be 1%.(going up from ~0.3% as decomposition advances) [23] Bamboo biochar and wood biochar have the same C/N ratio[24] The C/N ratio of softwood may be 640, of hardwood may be 560 and that of sawdust 500, which goes down as it rots (down to 200).[25] That is because the level of carbon (and Na, K) goes down faster than the level of nitrogen (and P).[26] Nitrogen is usually retained until 50% of the carbon remains.[27] For the supply of carbon, one may process wood into sawdust, or one may let the chopped wood decompose naturally (with a lower C/N ratio).
For a resulting combined C/N ratio of 30:
- 200 g humanure (C/N=7.5) + 200 g Giant cane leaves (C/N=19.4) + 21 g bamboo sawdust (if C/N=400)
- 200 g humanure (C/N=7.5) + 200 g Panicum texanum (C/N=32.9) + 11 g bamboo sawdust (if C/N=400)
- 200 g humanure (C/N=7.5) + 200 g Giant cane leaves (C/N=19.4) + 63 g partially decomposed bamboo wood (if C/N=200)
- 200 g humanure (C/N=7.5) + 200 g Panicum texanum (C/N=32.9) + 24 g partially decomposed bamboo culms (if C/N=200)
- 200 g humanure (C/N=7.5) + 200 g Giant cane leaves (C/N=19.4) + 252 g partially decomposed bamboo culms (if C/N=50)
- 200 g humanure (C/N=7.5) + 200 g Panicum texanum (C/N=32.9) + 200 g partially decomposed bamboo culms (if C/N=50)
Fruit wastes may have a C/N ratio of 20-50.[28] Mango waste (without stone) may have a C/N ratio of 50.[29]
Urine
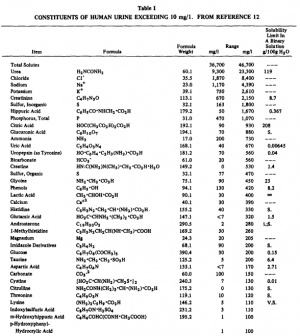
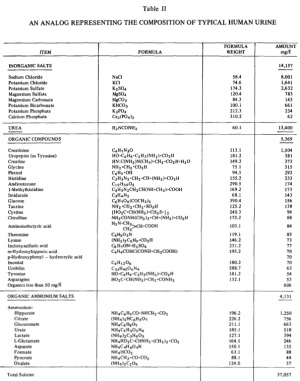
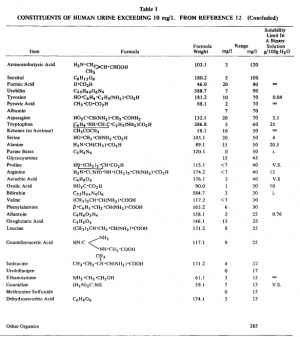
Excessive ammonia from urine inhibits the microbial processes in the chamber. With urine diversion, less bulking agent is needed and the C/N ratio is naturally enhanced. The C/N ratio of urine (1-2 L / person / day) is about 0.8, pH is 5 to 8, and its nitrogen content is ~15-18%.[30] Urine can contain up to 90 percent of the nitrogen, up to 50 percent of the phosphorus, and up to 70 percent of the potassium present in human excreta.[31] It may contain 9.3 g/L urea, 1.9 g/L chloride, 1.2 g/L sodium, 0.8 g/L potassium, 0.5 g/L phosphorus and 0.2 g/L ammonia.[32] In healthy individuals it is usually pathogen free, although undiluted it may contain inorganic salts and organic compounds at levels toxic to plants. Ureum decomposes into ammonia, which smells.
When applying urine to pastures, 14 to 28% of the nitrogen may evaporate in 2 weeks. 50% of that will be lost within the first 24 hours.[33] The level of nitrogen volatilized as ammonia increases with increasing temperature.[34] Urine can be used as a source of complementary nitrogen in high carbon compost. When diluted with water at a 1:8 ratio, it can be used as a fertilizer [35], comparable to commercial fertilizers.[36]
Though carbon is its principal required nutrient, Spirulina platensis may be grown on human urine [37] At pH 8.4, urea may be used as a source of nitrogen up to 1.5 g/L.[38] Since human urine typically contains about 9.3 gram urea per L [39], 1 L of urine may be added to 5.2 L of clean water (or 161 ml of urine per L clean water). Best cellular growth may occur at 500 mg/L of urea (53 ml urine per L clean water), as excess of urea decreases the efficiency of utilization of this nutrient.[40] Growth may be optimal when the urea feeding rate is slowly increased [41] and at 29°C. [42] Best results are obtained by continuous urea addition in exponentially increasing amounts, at 30°C.[43] Intermittent addition of urea yields results similar to those obtained by the continuous feeding.[44] Spirulina platensis may use several nitrogen sources; most effectively sodium nitrate, ammonium nitrate and urea.[45] Spirulina platensis grows better on urea than on potassium nitrate.[46] Nitrate may yield a higher dry weight.[47] Better biomass productivity values are observed with the use of urea as the nitrogen source, when compared to potassium nitrate, the traditional nitrogen source for Spirulina platensis cultivation.[48] In combination with bicarbonates, urea may be more effective than ammonium and nitrate.[49] Spirulina, when grown with urea as the nitrogen source, is characterized by a higher methionine and arginine content.[50] Urea is the best source for increasing γ-linolenic acid contents in Spirulina [51] and production is elevated in the dark.[52] Though Spirulina platensis may tolerate high levels of urea better [53], it is ammonium resistant at high pH.[54] Under alkaline conditions urea is spontaneously hydrolysed to ammonia.[55] The uptake of ammonia in Spirulina platensis (supporting optimal growth) is pH dependent with an optimum at pH 9.3, proceeding at the same rates in the light and in the dark.[56] High productivity is achieved when ammonia is maintained at up to 50% of the total nitrogen.[57] The uptake of nitrate is light energy dependent, and the reduction of nitrite consumes energy.[58] The mean lethal concentrations of unionised ammonia for Oreochromis niloticus larvae is 1 mg/L and 7.4 mg/L for fingerlings.[59]
Construction
For a continuous composting toilet, you need a 'slide'; a concrete chamber constructed on a slope. A small hill is of course ideal for building a continuous composting toilet on. You may also create a big pile of sand to build such a toilet on.
The top of the hill initially needs to be about 3 meters high. The slope on which the slide of the composting toilet will be build needs to be set at 30 degrees (both sides of the pile).
Both at the base of the steps and at the base of the slide, foundations need to be build. In this report, concrete blocks used for constructing the slide, the steps and the cabin are standard size concrete blocks as used in Ghana: 46 cm * 22 cm * 13 cm. Reinforced concrete used for the sides and the supporting columns is 10 cm thick, including the reinforcing steel bars.
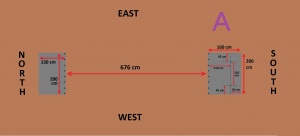
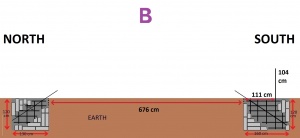
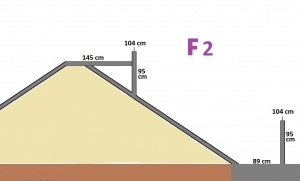
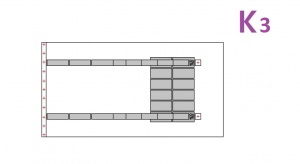
- 1) If no natural hill can be used, one needs to create one. But before doing so, it is most easy to construct the foundations first. That is because measuring the distance between the 2 foundations is more difficult when there is a pile of sand in between them. The space in between those 2 foundations needs to be 676 cm. The holes for the foundations need to be 120 cm deep and 200 cm wide, and 130 cm (the smallest one) and 160 cm long (the biggest one). to maximize sun exposure to the ventilation pipes, in countries in the Northern hemisphere (such as Ghana, The USA and Europe), the biggest foundation needs to be on the south side, and the smalles one on the north side. For countries in the southern hemisphere (such as Australia, South Africa, Argentina), this needs to be the other way around. See illustration A. The concrete in the foundations may contain medium sized rocks (up to 25 cm diameter). You need a framework of steel rods to reinforce the foundations and connect them to the reinforcing bars in the reinforced concrete on the sides of the pyramid. All around the steel framwork, you may fill up the foundation holes with concrete blocks for filling and support. In the largest foundation, you need to connect 2 steel rods extending 104 cm vertically into the air to the steel framework, both at 111 cm from where the foundation begins (from the perspective of sitting on the hill). Spacing (in width) between those 2 steel rods needs to be 112 cm. In width, they are both 56 cm away from the center of that 200 cm wide foundation. See illustration A. Spacing for the (at 30 degrees) steel rods (2x8) that will be connected to the steel rods framework in the sides (at 30 degrees also), needs to be 27 cm. Thus, they need to be placed at 5 cm, 32 cm, 59 cm, 86 cm, 113 cm, 140 cm, 168 cm and 195 cm, all 5 cm inside the foundation. See illustration A. Also, these 30 degrees steelrods in the foundation need to be extended above ground, maybe as much as 50 cm. That way you may connect (weld) them to the steel rods reinforcing the sides of the pyramid. See illustration B.
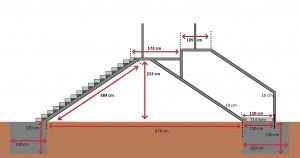
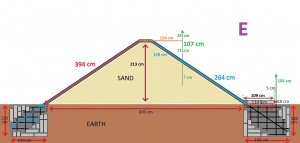
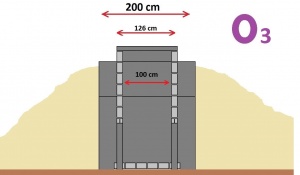
- 2) After constructing the foundations, one should dump a big truckload of sand in between the newly created foundations, and let it sit for as long as possible (preferrably months, or even years), so that the rains may let the sand pile become more compact. Once sufficiently compact, the top of the pile should be at least 300 cm. Eventually, the more compact pile of sand needs to be shaped into a pyramid that is 225 cm high at its peak. Then level the top at 213 cm high. This leveled top needs to be 200 cm long and 40 cm wide. See illustration E. The 40 cm sides should face east and west.
Before the pile is levelled at 213 cm high, the bottom of the sand pile should be 676 cm wide for a breadth of at least 2 meters (the width of the base). A that width (676 cm), the sides of the pyramid should be 455 cm each, which constitues an angle of 30 degrees. (each 30 cm of going wide comes with going up or down 20 cm) See Illustration E.
- 3) Alternatively, you can also dump the sand first, and then build the foundations. Or maybe there is a natural hill already, or a big rock or similar. In that case, you need to work around the hill/rock to measure the distance between the 2 foundations. See illustration D. Create a large C-shaped framework of planks. Then place it around the hill to determine where the foundations should be. This framework can only give you the correct locations for the foundations if it is perfectly right-angled. To construct a perfectly righ-angled frame, you just need to follow the instruction in illustration C; First you need a plank (or several planks connected) that is 676 cm plus 2 times its width (say 2 * 20 cm = 40 cm) long; in this case 716 cm in total. Then you need to attach 2 more planks (each at least 338 cm long), both in a right angle. To make these perfectly right-angled, you need to attach 2 additional planks (each at least 240 cm long), at an angle of exactly 45 degrees. To do so, the measurements and attachment points need to be exact, as illustrated. This will create 2 right-angled triangles measuring 150 * 150 * 212 cm; coloured purple in illustration C.
- 4) One month after constructing the foundations, you may continue with the next step. One month of waiting allows for an increase in strength of up to about 60% of ultimate strength of the foundation. As shown in illustration E and F, use 2 concrete blocks; face down. (13 cm height, 46 cm width, 22 cm breadth, on top of 1 cm mortar) Then work your way up from the foundations to the top of the pile, covering the sides with reinforced concrete; 200 centimeters wide. The reinforced concrete on both sides needs to be made 10 cm thick, totally suspending the steel rods midways. For this you first need to cover the sand with wooden casts (with approximately 0.5 cm thick plates on both sides and on top; eg triplex / duplex plates) Put 3 cm rocks underneath the rods, so the rods will be suspended in the concrete. Connect steel rods to all the (2x8) rods extending at 30 degrees from the foundations. Again use about 27 cm spacing for the steel rods, with #1 and #8 placed only 5 cm from the side. Thus, again, they need to be placed at 5 cm, 32 cm, 59 cm, 86 cm, 113 cm, 140 cm, 168 cm and 195 cm width. So, for the 200 cm width you will need 8 parrallel running steel rods. Connect the reinforcing steel rods on the sides (2x8) with the (8) ones on top. The steel rods on top of the base need to be 154 to 158 cm long. Spacing should be similar, at 5 cm, 32 cm, 59 cm, 86 cm, 113 cm, 140 cm, 168 cm and 195 cm width.
Of course you may also use prefabricated 200 cm wide steel bar welded mesh sheets. And if only 240 cm wide steel bar mesh sheets are available, of course you should make the base 240 cm wide (including the foundations). Of course, thicker steel rods will give greater span strength, due to their greater thickness. Usually, the sheets and rods are 600 cm long. That is exactly what you may squeeze into the total of foundation plus sides. If you want to use the entire 6 meter long rods or sheets, create 2 big foundations of 120 cm deep and 190 cm long (plus 200 or 240 wide, of course). Then they may fit perfectly. Instead of using full length rods, you may also connect (weld) several shorter rods to get to that total length.
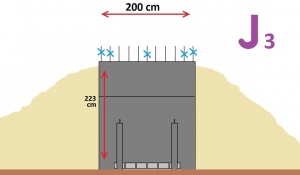
When constructing the steel framework for the sides, you also need to insert steel rods for constructing the back wall of the slide (side 4 of the scale model). They should be 115 cm long, measured from where connected to the steel rods on the side of the pyramid. Naturally, these rods may be much longer (eg 200 cm), because when they extensively penetrate the sand on the bottom side, this may enable easy welding when connecting them to the rods on the slide side of the pyramid. Spacing should be done very accurately, as they will support both the cabin floor and the top of the slide, with the latter having specific requirements. See illustration F3. Place the rods at 5 cm, 24 cm, 42 cm, 62 cm, 82 cm, 100 cm, 118 cm, 138 cm, 158 cm, 176 cm and 195 cm.
When pouring the concrete slab, only do the sides of the pyramid. That is because you need to let the concrete rest for another month to let it gain strength.
- 5) Then create the casts for the back wall of the slide and for the cabin floor, and fill them with concrete. See illustration F2. This time you do not need to wait any time before going on to perform step #6.
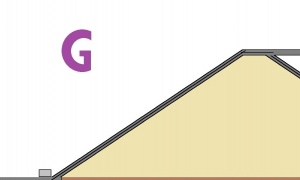
- 6) Next you need to construct the steps. Start with placing one concrete block at the bottom of the pyramid, In the center of its 200 (or 240 cm) width. The full 46 cm long side of the block should align with the side of the pyramid, 13 cm high and 22 cm wide. See illustration G. Fill up the triangle-shaped space between the block and the pyramid using stones and concrete. Add just 0.5 cm of mortar on top of the tip of the concrete block. The second block should be placed on top of that, aligning with the pyramid. That way, the 2nd block will overlap about just 1 or 2 cm of the 1st block, and lean on the pyramid on the other side. See illustration H. Again, fill up the triangle-shaped space between the block and the pyramid using stones and concrete. Repeat this 13 more times, until you have used 15 blocks (steps) in total. See illustration i. The last one needs to be cut and placed just behind block #15 , level with the cabin floor.
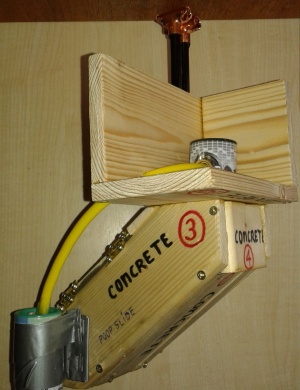
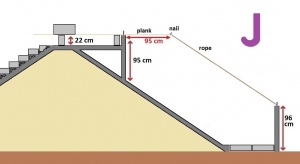
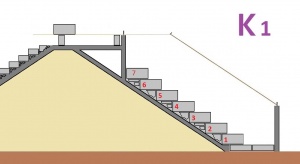
- 7) Then place 2 concrete blocks on the cabin floor, on their sides (22 cm high). Place a 250 cm long plank on top of them, such that the free end of the plank extends 95 cm beyond the back wall of the slide. Place another concrete block on top of the plank, to keep it level. See illustration J. Then hammer a nail in at the outer end of the free end of the plank. Then tie a thread around the nail and tightly connect the other end of the thread to the bare piece of steel bar sticking out from the frontside column. This will function as the upper limit for the masonry work; for cementing the concrete blocks.
- 8) The concrete blocks will form side 2 and 3 of the scale model, supporting the top of the slide. We will use the standard size concrete blocks in Ghana: 46 cm * 22 cm * 13 cm. You should start working your way up aligning the blocks to the left side (to the bottom of the slide; side 1 in the scale model). Place each whole new block as far to the left as possible. This way you need to work your way 7 blocks up. See illustration k.
- 9) Then fill up all the spaces on the right side of the composed concrete blocks with broken blocks, stones and mortar. See illustration L.
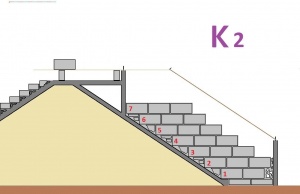
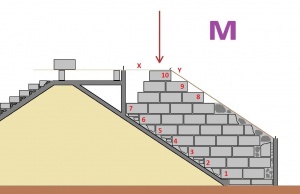
- 10) Then continue with whole (intact) blocks. Align these blocks to the right, in such a way that the tops of block number 8, 9 and 10 all just touch rope Y. See illustration M. This way, block number 10 will align with the covering plank X.
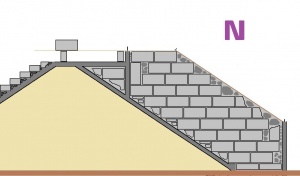
- 11) Then again use whole and broken blocks, stones and mortar to fill up the remaining spaces. See illustration N.
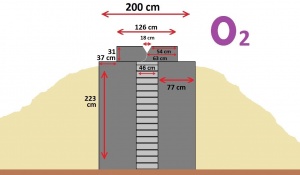
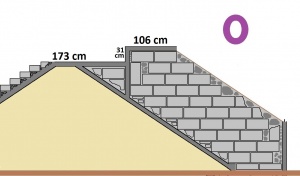
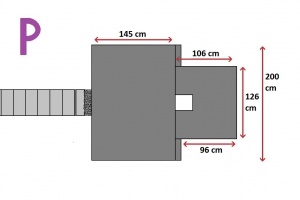
- 12) After another month, the top of the slide may be constructed, again using a wooden cast and reinforced concrete. See illustration O. For the measurements, see illustration P for a view from above ("helicopter view"). In illustration Q, the locations of the steel rods from the supporting columns penetrating into the cabin floor are shown by red squares.
- 13) Lastly (after another month), the cabin is constructed, using wood or concrete blocks.
Concrete
The foundation and the base of the construction (collectively named "the base" here), need to be constructed using reinforced concrete. All the reinforced concrete used for covering the sides of the pyramid, for erecting the back and the front wall of the slide, and for the floor of the toilet cabin and extending the top of the pyramid to the floor of the cabin, will be 10 cm thick. At the bottom of the pyramid, the reinforcing steel bars from both sides of the pyramid need to be attached (welded) to the steel framework in the foundations. On the top of the pyramid, the bars from both sides of the pyramid need to be welded together at their junction. From that concrete top, the bars need to extend a further 71 cm extra into the air, on both sides. For the base (the sides of the pyramid) you need long reinforcing steel bars, which may be several smaller ballers connected (welded) to each other. Total length of the longest one is 630 cm (at the side of the slide) and the other one is 599 cm. At each side you need 8 bars, to create a width of 200 cm. Again, you need to place 3 cm rocks underneath the reinforcing bars. If the reinforcing bars are not raised, they will not be suspened in the slab, weakening the structure.
For the foundations in the ground you need to construct a small framework (cage) of steel. The framework may be supported by concrete blocks. If not, use 3 cm diameter rocks on the bottom of the hole to place the cage on, so that the slab may creep under the lowest reinforcing bars of the cage. The largest foundation (on the slide side) needs to be 160 * 120 * 200 cm. The smaller foundation needs to be 130 * 120 * 200 cm.
Concrete blocks are best made on-site. That is because in developing countries commercially purchased blocks are often weak, due to the manufacturer using too little cement, or poor quality sand to save costs. The blocks may also have been allowed too little time to cure. Making blocks on-site, you need good quality sand (also needed for creating the hill) and a block-pressing machine. Good quality sand contains little organic material, clay, silt, salt or mica. When you buy cement, make sure the cement has not been exposed to water, and was preferrably stored in plastic (garbage) bags.
For good concrete, you need about twice as much rocks (in volume) as sand. The more cement is used, the stronger the concrete will be. A good ratio is 1:2:4 (one bucket cement, 2 buckets sand and 4 buckets filled with stones). The mortar for masonry work (for laying block and parging) should contain 3 to 4 buckets of sand for each bucket of cement used. The rocks should be maximally 3 cm in diamter. For the foundation (only) though, also bigger rocks may be used.
'The Volcano', for mixing
The universally applied method for mixing water into the dry aggregate is 'the volcano'. First you make a pile. Then you use a shovel to create a mound with a crater in the middle, where the water is added. Use the shovel to add some dry aggregate from the edges into the water, while moving around the pile in a circle. Slowly the mix will get thicker, and you may widen the crater. But never add too much water at once, as this will make the wall collapse, and cement to be spilled. Once all the aggregate has been mixed in and has absorbed some water, the mix is strong enough to hold itself up when placed on the floor in large clumps. Then you need to turn it all over several times, to create an overall uniform consistency. Extra water will decrease the strength. Within hours of adding water, the mix has finished setting, and can no longer be worked. The finished product should be covered with plastic, particularly in tropical conditions. If left uncovered, the end product will dry way too fast, which will cause cracking. After drying, the mortar and concrete need to time to develop strength. About 10 days later, the product will have gained 50% of its ultimate strength. This will have increased to 95% after 6 months, and 100% after one year.
Toilet Seat
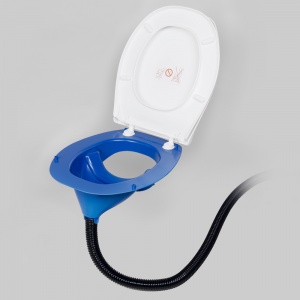
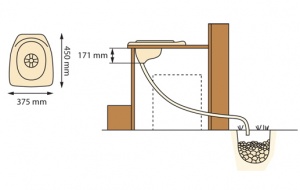
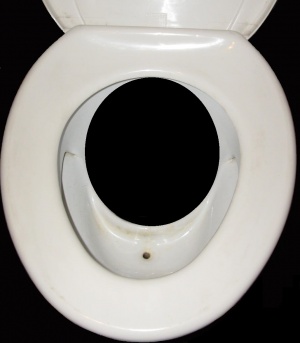
For toilet seat you may buy a premanufactured urine diverting kit (eg Separett Privy; about 140 euro), or you may use a normal toilet seat with a funnel (for urine) installed on the front. Such a funnel can be ceramic, locally manufactured, or plastic. The funnel should have a 18 cm diameter, and should be connected to a hose that channels the urine to a urine deposit container.

